Before you begin
Install the iso image of archlinux in your device. Arch linux iso images for arm devices are available at https://archlinuxarm.org/platforms.
For Raspberry pies, you could also use other distros like raspbian, but I perfer Arch for its ease of use, lightness and performance.
If you are using a raspbian flavor you will want to replace the pacman -S or yaourt -S with the distro's packet manager, like apt, yum or portage. After installation, ssh into the server and follow the instructions below.
Install the MPD, Minidlna, vsftpd in the server
ssh <username>@<ip address>
# Example: ssh [email protected]
MPD
Its a very lightweight music server and awesome as well. It is installed in the player device (server). The client can be running in this server or any other devices in the network.
sudo pacman -S mpd
You might wanna use mopidy as its replacement. Mopidy is kind of cool. If you haven't heard of it yet, think of it as mpd with lots of plugins like, playing from youtube, spotify, sound cloud, etc. Even with all these features, there are two downsides that may or may not bother you.
Downsides:
- It cannot give you the lightness like mpd. Sometimes, you might feel degrade in performance of raspberry pi.
- You will not be able to play both in your music server and stream the song to other devices.
Minidlna
This is the lightweight Media server through which you can stream pictures, audios, and videos into your desktop, latop, or mobile devices. You can replace it with lots of other upnp/dlna servers like Kodi, Rygel, etc.
sudo pacman -S minidlna
Vsftpd
This is the ftpserver for you to upload your music to raspberry pi. When you want to upload musical contents to your server, you will be able to do so using ftp browsers. Almost all file browsers in linux can handle ftp. Plus you can access it via command line. For OS X, and Windows use filezilla.
sudo pacman -S vsftpd
Configure those servers.
MPD
Here is the configuration you can use for mpd /etc/mpd.conf. The music_directory is where you keep your music files. In the config we are pointing the files to /srv/ftp/music, because we will be using ftp to upload files to this folder.
You can see two audio_outputs below. One of them is to play via alsa in the server. The other is to stream via http.
 # /etc/mpd.conf
 # See: /usr/share/doc/mpd/mpdconf.example

 log_file "/var/log/mpd.log"
 music_directory "/srv/ftp/music"
 pid_file "/run/mpd/mpd.pid"
 db_file "/var/lib/mpd/mpd.db"
 state_file "/var/lib/mpd/mpdstate"
 playlist_directory "/var/lib/mpd/playlists"
 sticker_file "/var/lib/mpd/sticker.sql"

 audio_output {
 type            "alsa"
 name            "My ALSA Device"
 #      device          "hw:0,0"        # optional
 #      mixer_type      "hardware"      # optional
 #      mixer_device    "default"       # optional
 #      mixer_control   "PCM"           # optional
 #      mixer_index     "0"             # optional
 }

 audio_output {
	  type		"httpd"
	  name		"My HTTP Stream"
	  encoder		"vorbis"		# optional
	  port		"8000"
 #	quality		"5.0"			# do not define if bitrate is defined
	  bitrate		"128"			# do not define if quality is defined
	  format		"44100:16:1"
	  always_on       "yes"			# prevent MPD from disconnecting all listeners when playback is stopped.
	  tags            "yes"			# httpd supports sending tags to listening streams.
 }
Minidlna
Add the following configs to /etc/minidlna.conf
# /etc/minidlna.conf
port=8200
user=minidlna
media_dir=/srv/ftp
friendly_name=Pie Media Server                      # Optional

album_art_names=Cover.jpg/cover.jpg/AlbumArtSmall.jpg/albumartsmall.jpg/AlbumArt.jpg/albumart.jpg/Album.jpg/album.jpg/Folder.jpg/folder.jpg/Thumb.jpg/thumb.jpg

inotify=yes
enable_tivo=no
strict_dlna=no
notify_interval=900
serial=12345678
model_number=1
Vsftpd
This one to to allow users to anonymously login and upload music to your server. Put the followings in /etc/vsftpd.conf
# /etc/vsftpd.conf
anonymous_enable=YES
local_enable=NO
write_enable=YES
anonymous_enable=YES
anon_upload_enable=YES
anon_mkdir_write_enable=YES
anon_root=/srv/ftp
anon_max_rate=2048000
xferlog_enable=YES
listen=YES
chown_uploads=YES
chown_username=ftp
chown_upload_mode=0755
allow_writeable_chroot=YES
Create the necessary folders
Create the music folder for mpd to work. You can also create pictures and videos folder and upload the contents respectively. These will work only for minidlna. Make sure necessary access to user, and groups are given to the folders. Here is one that will work for you.
sudo mkdir /srv/ftp/music/
sudo gpasswd -a mpd audio
sudo gpasswd -a mpd ftp
sudo chmod g+w /srv/ftp/ -R
sudo chown ftp.ftp /srv/ftp/ -R

sudo touch /var/log/mpd.log
sudo chown mpd.mpd /var/log/mpd.log
Install Upmpdcli from AUR
You can use yaourt for installing upmpdcli. You will also need to install libupnpp, from aur. When using yaourt, it will automatically take are of this for you. If you are manually installing then here are the links for you. Dont forget to install base-devel package.
- libupnpp https://aur.archlinux.org/packages/libupnpp/
- upmpdcli https://aur.archlinux.org/packages/upmpdcli/
Dont forget to change the architecture in PKGBUILDs of upmpdcli and libupnpp, if you are compling for arm devices. For exmaple if you are compiling for raspberry pi v1, assign armv6h to arch variable
arch=('armv6h')
Install Ympd from AUR
Ympd is a great MPD Client for web. You can use yaourt for installing ympd. Or, manual installation can be done, from https://aur.archlinux.org/packages/ympd-git/. You will need to download the aur and extract the pkbuild. Then run command `makepkg -is` to build and install ympd.
Enable servers
sudo systemctl enable vsftpd
sudo systemctl enable mpd
sudo systemctl enable upmpdcli
sudo systemctl enable ympd
[Optional] Automatic Mounting removable media to music folder
The following settings will automatically mount your usb to media which will be a symbolic link from /srv/ftp/music/media.
Install Udevil
sudo pacman -S udevil
Enable kernel polling on removable devices
sudo echo 'ACTION=="add", ATTR{removable}=="1", ATTR{events_poll_msecs}=="-1", ATTR{events_poll_msecs}="2000"' > /etc/udev/rules.d/61-removable-storage-polling.rules
Add the `allowed_internal_devices = ` into */etc/udevil/udevil.conf
sudo echo 'allowed_internal_devices = *' >> /etc/udevil/udevil.conf
Create symlink
sudo ln -s /media /srv/ftp/music/media
Enable devmon service for mpd user
sudo systemctl enable devmon@mpd
Now you will be able to play from mounted usb drives after refreshing/updating the database.
Accessing the music server
Static IP
A static ip is recommended for the server. There are several ways to do this. You can configure it in the music server. Here is the link to do it: https://wiki.archlinux.org/index.php/Network_configuration#Static_IP_address. However, adding static ip through your router is recommended.
Web GUI
Via web browsers you can access the music player using http://<ip address>:8080. If the ip address of music server is 192.168.1.123, enter http://192.168.1.123:8080 in your web browser.
Android Smart Phones
You can use mpd clients like MPDroid. Install it from google play. You can now set the default settings as this music server. All you will need to do is store the server's ip address in the app.
Streaming the audio in other devices via network
If you want to use other devices to stream audio via network then enter the url http://<ip address>:8000 [Example: http://192.168.1.123:8000] in your web browser or music players like vlc or mplayer. You can used both the music server and http streaming. Note: There can be small difference in the timing of playing in different http streamed devices. Make sure that My HTTP Stream is enabled in audio outputs. If you disable My ALSA Device, only the http stream get played.
You can try it now, play music and run the following command.
mpv http://<ip address>:8000
# Example: mpv http://192.168.1.123:8000
Desktop Applications
You can use mpd client like sonata, ncmcpp and cantata to control the music player. Client like cantata also alow you to stream audio, if you enter http://<ip address>:8000 [Example: http://192.168.1.123:8000], in the http stream url.
These apps are available in the repo. So, for example you can install cantata by:
sudo pacman -S cantata
If you want at different client, for a different devices check this list: http://mpd.wikia.com/wiki/Clients
Rendering media to music server through your source.
You can play music from your own devices into the music server. For this you need to have UPNP control poin application such as Upplay and BubbleUpnp player, in your device. For linux upplay works good. For android you will have lots of options like Yaacc(Open source) and BubbleUpnp player.
In these apps you get to select two options: Renderer and Library. You play the music from the library in the renderer device. So, you want to play your songs in to music server, select local library and music server for renderer.
Hope you enjoyed creating your music server.
I needed to add codesnippet plugin for source code syntax highlighting in ckeditor. This was to edit blog articles, and it was built in rails.
Ok so, I google searched the solution for installing the plugin and even tried reading the source code and understanding how it worked. Luckly, I found the solution in one of the issues pointed by google. I have summarized the solution for you.
Solution:
- Create folder app/assets/javascripts/ckeditor/plugins
mkdir -p app/assets/javascripts/ckeditor/plugins
- Copy the plugins you want to add, in app/assets/javascripts/ckeditor/plugins
- Add the plugin assets in to the asset compilation tree, by adding the following in config/initializers/ckeditor.rb
#handle custom addons
assets_root =  Rails.root.join('app','assets','javascripts')
ckeditor_plugins_root = assets_root.join('ckeditor','plugins')
%w(openlink sourcedialog).each do |ckeditor_plugin|
  Ckeditor.assets += Dir[ckeditor_plugins_root.join(ckeditor_plugin, '**', '*.js')].map do |x|
    x.sub(assets_root.to_path, '').sub(/^\/+/, '')
  end
end
- [Optional] Depending on the plugin you are installing you might need to modify the configs for ckeditor. There is a default config file is added by the ckeditor gem. You can refer to this page for more info.
For reference, you can study the following link: https://github.com/galetahub/ckeditor/issues/450
The Editor War
According to wikipedia: Editor war is the common name for the rivalry between users of the Emacs and Vi ( Vim ) text editors. The rivalry has become a lasting part of hacker culture and the free software community.
There are a lot more interesting stuffs about The Editor War . Make sure you read the wikipedia.
Vim
Vim is a highly configurable text editor built to make creating and changing any kind of text very efficient. It is included as “vi” with most UNIX systems and with Apple OS X.
Emacs
Emacs is almost like an operating system, you can do lots of things from it. It also happens to be a text editor.
You wouldn't want to use Emacs unless you have a problem or you have reached a limitation with other editors.
Spacemacs
The Editor War created the idea of Emacs vs Vim . Also, that Vi and Emacs are incompatible.
However Vim users have recently realized that Emacs can be Evil , being compatible with the idea to the Cult of Vi .
Spacemacs has proven “The best editor is neither Emacs nor Vim , it's Emacs and Vim !
Beginning Spacemacs
- Install the latest stable version of Spacemacs
The current stable version is 24.5
For Archlinux the command is:
sudo pacman -S emacs
For Ubuntu the command is:
sudo apt-get install emacs
- Download the Spacemacs to ~/.emacs.d/
git clone https://github.com/syl20bnr/spacemacs.git ~/.emacs.d/
- Add auto-complete, better-defaults, git, helm, html, javascript, ruby, ruby-on-rails, spell-checking version-control and yaml to dotspacemacs-configuration-layers
For reference check the Configuration Layer Documenation
dotspacemacs-configuration-layers
'(

auto-completion
better-defaults
git
helm
html
javascript
ruby
ruby-on-rails
spell-checking
syntax-checking
version-control
yaml
)
- [ OPTIONAL ] Or, better you can use my use my spacemacs configurations
All you need to do is download them, and copy configs
cd ~/.emacs.d/
rm -rf private
git clone http://github.com/krazedkrish/spacemacs-private-layer.git private
mv private/.spacemacs ~/.spacemacs
This command copies my configs for spacemacs in your machine
- Now all you, all you need to do is run emacs
emacs
It will automatically download the necessary the first time, or after any changes made to the configurations.
Why Spacemacs?
According to Spacemacs's Hihghlighted features , the reasons to use Spacemacs are:
- Bring the efficiency of modal editing to the powerful Emacs lisp platform. Modal UX is optional and Spacemacs can be used with only Emacs key bindings.
- Integrate nicely with Evil states (Vim modes).
- Keep your fingers on the home row for quicker editing with support for QWERTY and BEPO layouts.
- Minimalistic and nice graphical UI, keep your available screen space for what matters: your text files.
- Fast boot time, packages and configuration are lazy-loaded as much as possible.
- Lower the risk of RSI by heavily using the space bar instead of modifiers. If you have issues with your thumbs you can still use Spacemacs using modifiers.
- Contribute easily your improvements and new configuration layers.
- Very active and helpful community on Gitter and IRC (via Gitter IRC bridge)
You might be interested to
You might be interested to read about these:
In my next article I will write about the basic key bindings you would need to know for Spacemacs
Plim
Plim is a Python port of Ruby's Slim template language built on top of Mako Templates. It uses Mako's preprocessor feature to translate its syntax into a valid HTML/Mako markup.
Bottle
Bottle is a fast, simple and lightweight WSGI micro web-framework for Python. It is distributed as a single file module and has no dependencies other than the Python Standard Library.
BTW it is the best framework to be used with Raspberry Pi
Using Plim with Bottle
All you need to do is create a wrapper. Mine is called bottlim.py
# bottlim.py

import functools
from  bottle import template, view, BaseTemplate, DEBUG

class PlimTemplate(BaseTemplate):
    def prepare(self, **options):
        from mako.template import Template
        from mako.lookup import TemplateLookup
        from plim import preprocessor
        options.update({'input_encoding':self.encoding})
        options.setdefault('format_exceptions', bool(DEBUG))
        lookup = TemplateLookup(directories=self.lookup, **options)
        if self.source:
            self.tpl = Template(self.source, preprocessor = preprocessor, lookup=lookup, **options)
        else:
            self.tpl = Template(uri=self.name, preprocessor = preprocessor, filename=self.filename, lookup=lookup, **options)

    def render(self, *args, **kwargs):
        for dictarg in args: kwargs.update(dictarg)
        _defaults = self.defaults.copy()
        _defaults.update(kwargs)
        return self.tpl.render(**_defaults)


plim_template = functools.partial(template, template_adapter=PlimTemplate)
plim_view = functools.partial(view, template_adapter=PlimTemplate)
Then you can use PlimTemplate by importing plim_template, here is an example
# the import lines
from bottlim import plim_template as template, plim_view as view

@route('/')
def index():
    # the view file name is expected to have extension .html
    # in the following case it will use the template file index.html
    return template('index')
If you don't have your index.html in plim template ready. Copy paste these
doctype html
html
  body
    h1 Hello World
To understand these you must have a good understanding of git.
Some use-cases
First here are some situations that you usually face in software development:
- You have made a lot of changes. You had to solve 1 issue, instead you solved 3. Now you want to commit all of those separately instead of a single one. What do you do? Create backups? Well, thats bad.
- You have again made a lot of changes. Now you decide to remove some of those, like console.log, debugger, binding.pry, embed(), etc. How can it be done efficiently ? B`y adding git gutter mode to your editor and searching for the edits you made recently.
- You perfectly understand what merge and rebase do. Imagine, you got stuck in a worse bug. While solving it, you created another branch and made a lot of comments. Now, you wanna add only some of the commits from that branch. For example there were lots of debugging, commenting, logging, verbose, etc involved and you committed solutions separately. Now you wanna add only those solutions from that temporary branch to develop branch. Would you merge or rebase.
- You made some commits and now you with you could go back.
- You want to change something in the history, a statement, author name, file name, delete/add/modify files/lines. and so on.
Solutions
- git add -p
Add the changes selectively using the patch mode.
$ git add -p - git checkout -p
Checkout lines of file/files selectively using patch mode.
$ git checkout -p - git cherry-pick <commit>
Given one or more existing commits, apply the change each one introduces, recording a new commit for each. This requires your working tree to be clean (no modifications from the HEAD commit).
$ git cherry-pick <commit>You would also want to use –no-commit a lot with it.
This would cherry-pick but would not commit. Otherwise, git cherry-pick would commit automatically commit.
$ git cherry-pick -n <commit>You can also cherry-pick a range of commits. The following command would cherry-pick a range from the <newercommit> to, but excluding <oldercommit>
$ git cherry-pick <oldercommit>..<newercommit>If you want to include the <oldercommit> as well in the range, then run the following one.
$ git cherry-pick <oldercommit>^..<newercommit> - git revert <commmit>
Given one or more existing commits, revert the changes that the related patches introduce, and record some new commits that record them. This requires your working tree to be clean (no modifications from the HEAD commit).
$ git revert <commmit>For –no-commit and range, its same as above.
$ git revert -n <commmit>                   # revert but no commit
$ git revert <oldercommit>..<newercommit>   # revert a range excluding the <oldercommit>
$ git revert <oldercommit>^..<newercommit>  # revert a range including the <oldercommit>
- git rebase -i <commit>
Don't be afraid to rebase
$ git rebase -i <commmit>You can do a lot of things. The following actions are avaliable for you.
- p, pick = use commit
- r, reword = use commit, but edit the commit message
- e, edit = use commit, but stop for amending
- s, squash = use commit, but meld into previous commit
- f, fixup = like “squash”, but discard this commit's log message
- x, exec = run command (the rest of the line) using shell
Tip: Instead of these commands you can you magit, that has all. I am sure you would like it.
Check it out https://github.com/magit/magit/
As a developer whenever you install ubuntu 14.04, you would wanna use these 5 ppas
- For Git 2.x
ppa:git-core/ppa
- Emacs Snapshot
ppa:ubuntu-elisp/ppa
- Tmux, vim, rxvt-unicode, swig, figlet-fonts, apt-cacher-ng
ppa:pi-rho/dev
- Nodejs
ppa:chris-lea/node.js
you can also run the following script instead
curl -sL https://deb.nodesource.com/setup_5.x | sudo -E bash - - Postgresql
wget --quiet -O - http://apt.postgresql.org/pub/repos/apt/ACCC4CF8.asc | sudo apt-key add -
Note:
$ sudo add-apt-repository ppa:chris-lea/node.js
$ sudo apt-get update
$ sudo apt-get install <package name>
Here is how to do it
- Append the following to /etc/pam.d/sshd
session optional pam_exec.so seteuid /etc/ssh/login-notify.sh
- Create a new file /etc/ssh/login-notify.sh and add execution permission to the file
$ sudo touch /etc/ssh/login-notify.sh
$ sudo chmod +x /etc/ssh/login-notify.sh
- Add the following to /etc/ssh/login-notify.sh
#!/bin/sh

if [ "$PAM_TYPE" != "close_session" ]; then
  host="`hostname`"
  message="SSH Login: $PAM_USER from $PAM_RHOST on $host"
  DISPLAY=:0 /usr/games/xcowsay "$message"&
fi
if your are and arch user replace this line
DISPLAY=:0 /usr/games/xcowsay “$message”&
with the following
DISPLAY=:0 /usr/bin/xcowsay “$message”&
if you want to used notify-send instead you can replace it with
DISPLAY=:0 /usr/bin/notify-send “$message”& What I acutally use is https://github.com/haude/xcowsay-utils
- If want a mail to be sent as a notification (probably because you want notification from the server), then replace the DISPLAY statement with
{
  echo "User: $PAM_USER"
  echo "Remote Host: $PAM_RHOST"
  echo "Service: $PAM_SERVICE"
  echo "TTY: $PAM_TTY"
  echo "Date: `date`"
  echo "Server: `uname -a`"
} | mail -s "$PAM_SERVICE login on `hostname -s` for account $PAM_USER" root
or something you like
Disclaimer:
This is not a standard way to create product filter. But its quick and it works.
If you want to follow the standard follow this sample/guide.
Quick tricks for Product Filter
Here is how to do it:
1. create /lib/spree/custom_search.rb file in your project folder
2. add require "#{Rails.root}/lib/spree/custom_search" to /config/initializers/spree.rb
3. create the module for ProductFilters
module Spree
  module Core
    module ProductFilters

    ...
    # your search scopes here
    ...

    end
  end
end
4. add the search scopes required.
module Spree
  module Core
    module ProductFilters

    # example scope
    # may be you guys can opitmize/shorten 2 queries in 1
    # I will be glad, if you include it in comments
    Spree::Product.add_search_scope :in_taxonomy do |taxonomy|
      taxons=Spree::Taxonomy.includes(taxons: :products).where(:id=>taxonomy).select(:id).map &:taxon_ids
      taxons=taxons.flatten

      # the line below will be concatinated to the select query for the product
      # so you dont have to with "Spree::Product..."
      in_taxons(taxons)
    end

    end
  end
end
Again, this is not a standard approach. But If all you need is to add one line why follow the standard Product Filter. Standards are to ease the development time. What if! not following the standards does less harm and more good, I say:
“Be agile and lazy! Be awesome!!”
You dont agree with me. No Problem! Here are some useful reference for you for building standard ones.
- <spree gem>/core/lib/spree/core/product_filters.rb
- https://gist.github.com/maxivak/cc73b88699c9c6b45a95
- https://gist.github.com/Ranger-X/2511088
- https://gist.github.com/berkes/1931810
- https://gist.github.com/killthekitten/4486585
You have already heard of and used popular plugins like projectile, magit, flymakes, smmooth-scroll, yasnippit, highlight-indentation, highlight-parentheses, sublimity, neotree and ofcourse <lang>-mode. So, what almost all emacs users use them.
Ok, now let me mention some cool and awesome emacs plugins and modes.
5 cool emacs plugins
1. highlight-symbol
Highlight-symbol is one of the coolest emacs mode you will be using frequently one you know what it does. Ok, so what does it do ? Well, it is useful for automatic and manual symbol highlighting for searched text/regex/phrases and replace them.
Here is the screenshot from the official highlight-symbol page.

;; highlight-sysmbol configurations
(global-set-key [(control f3)] 'highlight-symbol-at-point)
(global-set-key [f3] 'highlight-symbol-next)
(global-set-key [(shift f3)] 'highlight-symbol-prev)
(global-set-key [(meta f3)] 'highlight-symbol-query-replace)
(global-set-key [(control shift f3)] 'unhighlight-regexp)
(global-set-key [(control shift mouse-1)]
                (lambda (event)
                  (interactive "e")
                  (save-excursion
                    (goto-char (posn-point (event-start event)))
                    (highlight-symbol-at-point))))
2. flx-ido
flx-ido is a better alternative for the default ido. Unlike, default ido and emacs-helm search and others, it matches both abbreviations and substrings and their combimations. I guess the right phrase is awesome fuzzy matching in emacs. It uses the flx matching engine coded by lewang himself. It is available by default in MELPA and Mermalade. So, el-get users will have to add it manually. By the way, spacemacs users might not know that it is already avaliable in spacemacs, you just need to add it in in the ~/.spacemacs configurations.
In the github site, there is demo for helm support, all though it has not been added yet. Well, I have been eagerly waiting for its release.
Here is a Screencast showing rationale and ido workflow
3. hideshowvis
Its an old code folding emacs plugin under the GNU-GPL 2 license, but still works like a charm. Its minor mode will add little +/- displays to foldable regions in the buffer and to folded regions. It is indented to be used in conjunction with hideshow.el which is a part of GNU Emacs.
You can download it from http://www.emacswiki.org/emacs/download/hideshowvis.el
4. mode-icons
Forked originally from ryuslash's mode-icons this mode-icons-mode is simply cool. It shows mode icons instead of the mode name, if the icon is present. Currently it supports only major modes
Here is the list of supported major modes and the respective icons:
| Modes | icon |
|---|---|
| Coffee | |
| CSS | |
| Emacs-Lisp | |
| Haml | |
| HTML | |
| JS | |
| Lisp | |
| Org-mode | |
| PHP | |
| Python | |
| Ruby | |
| SVG | |
| Sass | |
| Scheme | |
| Shell | |
| Slim | |
| YAML |
As per the conversation with rhoit he is working on adding the minor mode icons as well.
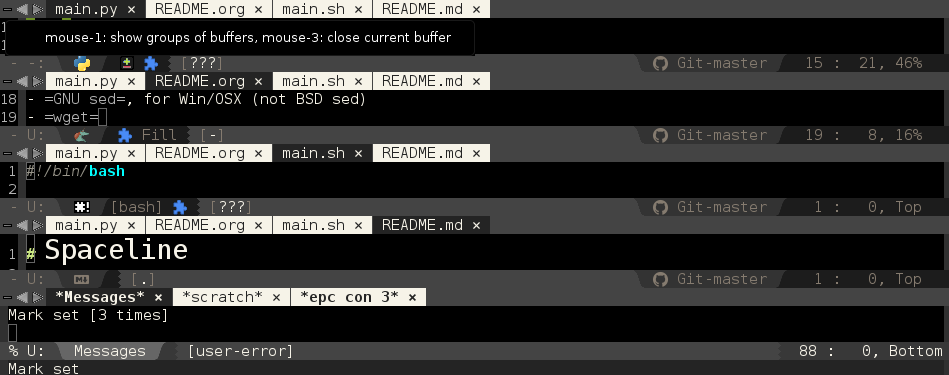
5. Emacs Powerline
vim-powerline was said to be very popular, you can find its influence in vim-airline and themes for tmux, bash, zsh, etc. I use it in my laptop, in zsh, tmux and ofcourse emacs.
Here is a screenshot of Powerline with Evil integration
Milkypostman's Powerline is very popular. I personally like the spacemacs's powerline theme.
If you are thinking of adding mode-icons with spacemacs's Emacs Powerline and wondering how it looks in normal emacs then look below:
So, you want to add it to your emacs. Ok here is how you do it.
Step 1: Install the Milkypostman's Powerline mode-line theme
Step 2: Download modeline.cfg-el from rhoit's dot-emacs configuration
Step 3: Add load it in your emacs configuration
;; In your ~/.emacs.d/init.el
(load "~/.emacs.d/config/modeline.cfg.el")
;; ~/.emacs.d/config/modeline.cfg.el is the location of the file
Ok guys, enjoy these awesome plugins in your emacs.
You have already installed the most awesome editor called emacs. And you have just opened it disappointed to find that it has nothing.
If you are reading this blog then Congratulations! You will surely understand why emacs is awesome, unlike the others who gave up on emacs after first try.
How to begin?
This is the question that i get asked a lot. But first
Before you begin…
Well, you need to have some background knowledge, I suggest you read these 10 Essentials first.
You also need a basic understand of buffer, emacs, major mode, minor modes, etc you can learn from the video below
Ok, now back to how to begin? Here is how you do it:
How to begin?
You need to configure emacs in ~/.emacs.d/init.el. What you do is, you include the packages which are the modes and you configure them (like set keybindings, font, width, etc)
There are lots of tools like elpa, melpa, quelpa. But what is suggest you is el-get. Lets do it the easy way.
Easy Way
Step 1
We are going to use the , so I suggest you fork it in github and clone it. You can fork mine [https://github.com/krazedkrish/emacs-kicker/] as well. If your are a pythonista or rubyist you can my clone python, or ruby branch respectively.
$ # here is how you configure mine
$ git clone -b essentials https://github.com/krazedkrish/emacs-kicker ~/.emacs.d
Step 2
Open emacs, all the packages are going to be installed you might need to restart emacs later.
Step 3
Open ~/.emacs.d/init.el and insert the extra packages you want below the following lines, then restart again:
;; now set our own packages
(setq
 my:el-get-packages
 '(el-get				; el-get is self-hosting
More Easier Way
There is actually a more easier way, which i actually don't suggest you unless you are a vim user. The more easier way is to use Spacemacs.
Enjoy you new emacs